

In this example we show how to connect a MLX90393 magnetic field sensor to a MSP-EXP432P401R LaunchPad, the example will use the Energia IDE.
I used a MLX90393 module in this example, which you can see below
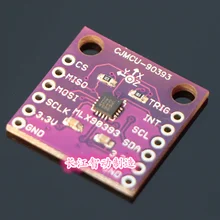
The MLX90393 is the newest addition to the Melexis position sensing portfolio, bringing the highest flexibility in the portfolio’s smallest assembly. Complementing this, the magnetic field sensor is designed for micropower applications, with programmable duty cycles in the range of 0.1% to 100%.
The MLX90393 magnetic field sensor can be reprogrammed to different modes and with different settings at run-time. The sensor offers a 16-bit output proportional to the magnetic flux density sensed along the XYZ axes using the Melexis proprietary Triaxis® technology and also offers a temperature output signal. These digital values are available via I2C and SPI, where the MLX90393 is a slave on the bus.
Link – https://www.melexis.com/en/product/MLX90393/Triaxis-Micropower-Magnetometer
Connection
Here is a picture of the launchpad so you can see what pins we are referring to below in the table
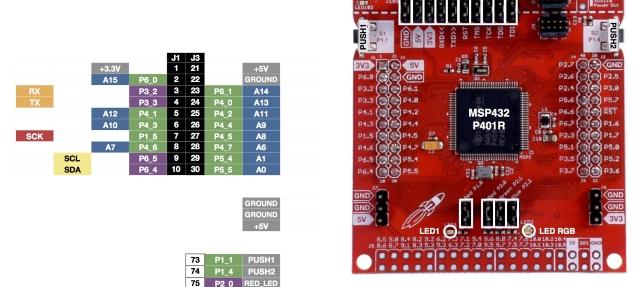
launchpad pins1
| Module Connection | MSP432 Connection |
| SDA | J1-10 SDA |
| SCL | J1-9 SCL |
| Gnd | J3-22 Gnd |
| Vcc | J1-1 3.3v |
Code
[codesyntax lang=”cpp”]
#include<Wire.h>

// MLX90393 I2C Address is 0x0C(12)
#define Addr 0x0C

void setup()
{
  // Initialise I2C communication as MASTER
  Wire.begin();
  // Initialise serial communication, set baud rate = 9600
  Serial.begin(9600);

  // Start I2C Transmission
  Wire.beginTransmission(Addr);
  // Select Write register command
  Wire.write(0x60);
  // Set AH = 0x00, BIST disabled
  Wire.write(0x00);
  // Set AL = 0x5C, Hall plate spinning rate = DEFAULT, GAIN_SEL = 5
  Wire.write(0x5C);
  // Select address register, (0x00 << 2)
  Wire.write(0x00);
  // Stop I2C Transmission
  Wire.endTransmission();

  // Request 1 byte of data
  Wire.requestFrom(Addr, 1);

  // Read status byte
  if(Wire.available() == 1)
  {
    unsigned int c = Wire.read();
  }

  // Start I2C Transmission
  Wire.beginTransmission(Addr);
  // Select Write register command
  Wire.write(0x60);
  // Set AH = 0x02
  Wire.write(0x02);
  // Set AL = 0xB4, RES for magnetic measurement = 0
  Wire.write(0xB4);
  // Select address register, (0x02 << 2)
  Wire.write(0x08);
  // Stop I2C Transmission
  Wire.endTransmission();

  // Request 1 byte of data
  Wire.requestFrom(Addr, 1);

  // Read status byte
  if(Wire.available() == 1)
  {
   unsigned int c = Wire.read();
  }
  delay(300);
}

void loop()
{
  unsigned int data[7];

  // Start I2C Transmission
  Wire.beginTransmission(Addr);
  // Start single meaurement mode,  ZYX enabled
  Wire.write(0x3E);
  // Stop I2C Transmission
  Wire.endTransmission();

  // Request 1 byte of data
  Wire.requestFrom(Addr, 1);

  // Read status byte
  if(Wire.available() == 1)
  {
   unsigned int c = Wire.read();
  }
  delay(100);

  // Start I2C Transmission
  Wire.beginTransmission(Addr);
  // Send read measurement command, ZYX enabled
  Wire.write(0x4E);
  // Stop I2C Transmission
  Wire.endTransmission();

  // Request 7 bytes of data
  Wire.requestFrom(Addr, 7);

  // Read 7 bytes of data
  // status, xMag msb, xMag lsb, yMag msb, yMag lsb, zMag msb, zMag lsb
  if(Wire.available() == 7);
  {
    data[0] = Wire.read();
    data[1] = Wire.read();
    data[2] = Wire.read();
    data[3] = Wire.read();
    data[4] = Wire.read();
    data[5] = Wire.read();
    data[6] = Wire.read();
  }

  // Convert the data
  int xMag = data[1] * 256 + data[2];
  int yMag = data[3] * 256 + data[4];
  int zMag = data[5] * 256 + data[6];

  // Output data to serial monitor
  Serial.print("Magnetic Field in X-Axis : ");
  Serial.println(xMag);
  Serial.print("Magnetic Field in Y-Axis : ");
  Serial.println(yMag);
  Serial.print("Magnetic Field in Z-Axis : ");
  Serial.println(zMag);
  delay(500);
}
[/codesyntax]
Output
Open the serial monitor and you should see something like this
Magnetic Field in X-Axis : 65511
Magnetic Field in Y-Axis : 65399
Magnetic Field in Z-Axis : 29
Magnetic Field in X-Axis : 29
Magnetic Field in Y-Axis : 65418
Magnetic Field in Z-Axis : 13
Magnetic Field in X-Axis : 20
Magnetic Field in Y-Axis : 65347
Magnetic Field in Z-Axis : 2
Magnetic Field in X-Axis : 65500
Magnetic Field in Y-Axis : 65423
Magnetic Field in Z-Axis : 26
Magnetic Field in X-Axis : 65518
Magnetic Field in Y-Axis : 65342
Magnetic Field in Z-Axis : 0
Magnetic Field in X-Axis : 65497
Magnetic Field in Y-Axis : 65382
Magnetic Field in Z-Axis : 65474
Magnetic Field in X-Axis : 65531
Magnetic Field in Y-Axis : 65345
Magnetic Field in Z-Axis : 65502
Links
CJMCU-90393, MLX90393 digital 3D Holzer sensor, displacement, angle, rotation, 3D position